PHP Media Filter API
In The Lab | May 7, 2013

Our PHP Media Filter API was originally created as a product to give anyone the ability to filter videos shot on their mobile devices and then easily share them across various social services. The original product has evolved into much more than that by allowing images, text overlays, an API, and an easily extendable set of filtering routines that allows for new filters to be added and tagged to specific developers or the global API. Today we're opening up the entire project on Github.
Right around the time Instagram was becoming popular we had the idea that filtering photos was great and all, but it'd be nice to be able to filter videos as well and easy share them just like Instagram did with photos. We wanted all the hard work to happen on the server so that updates were instantly available to the application on the device. So it was inevitable that we were going to have to build an API, which in turn had the benefit of allowing us to easily open the API up to anyone who wanted to use it.
To start out, we needed to decide out how this process would work, what software we'd need, and what hardware it would require. We chose FFmpeg to manipulate the videos and ImageMagick to manipulate the images. Now we needed to figure out how these two would work together to create a filtered video. The process we landed on was simple in theory; FFmpeg would generate an image sequence of the video with an image per frame, ImageMagick would then apply a filter to each image, and finally FFmpeg would compile the image sequence back into a video. While the process is simple, getting the video codecs, audio codecs, and image libraries working together to create a video that would playback on mobile devices at near flawless quality from the original was the real pain. After a lot of trial and error we settled on h.264 (libx264) for the video, AAC (libfaac) for the audio, and we'd only use PNGs for the images to minimize quality loss.
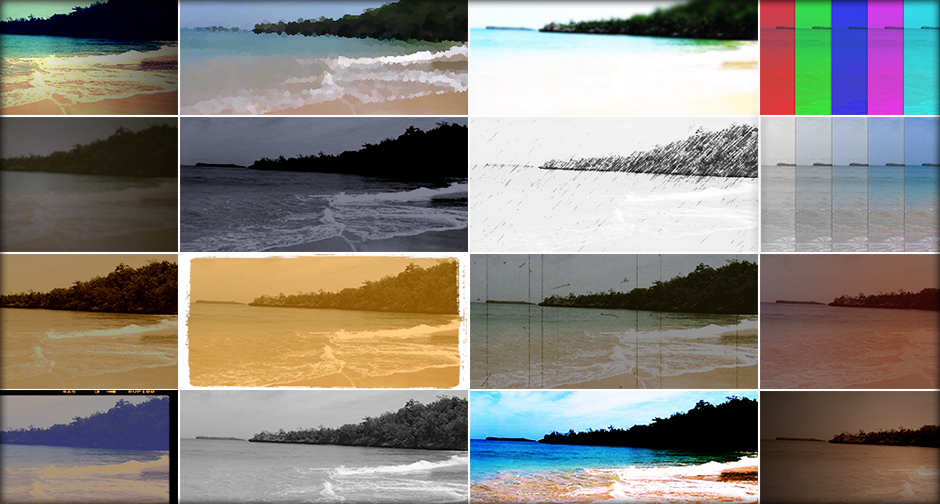
We had the process down and the technology in place, but since we were going to make this a public API that allowed developers to submit their own filters we had to come up with a simple and extendable structure for the filters themselves. We created a base filter class that each filter would extend, FilterBase. FilterBase exposes methods to add filter routines to a queue, then execute them when you're ready. It also provides a couple helper methods for common filter routines such as Colortone and Vignette. Each filter requires just one method to be present, filter(), that's called by the FilterFactory to filter the images. The filter() method requires two arguments if the filter doesn't require any additional parameters such as red, green, blue, etc. If the filter requires additional parameters, then a third argument is required to accept the array of key=>value pairs that are required. An example of the Lomo filter is below.
1 | class Lomo extends FilterBase { /** * @var number $width **/ private static $width; /** * @var number $height **/ private static $height; /** * __construct * * @return void * @throws Exception **/ public function __construct() { throw new Exception('Lomo is a static class. No instances can be created.'); } /** * Method for filtering an image * **/ public static function filter($original_image, $preview_image) { list(self::$width, self::$height) = getimagesize($original_image); self::addCommand("convert " . $original_image . " -channel R -level 33% -channel G -level 33% " . $preview_image); self::addCommand(self::vignette($preview_image, $preview_image, self::$width, self::$height)); self::run(); } } |
You can see from the sample above, we first add a command to modify the color channels of the image, then add a command to apply a vignette to the image, then we run the filter. The Lomo filter doesn't require any addition parameters to run so it only needs to accept two arguments; the path to the original image and the path to the preview image. Below is an example of a filter that requires additional parameters.
1 | class Tint extends FilterBase { /** * @var number $red **/ private static $red; /** * @var number $green **/ private static $green; /** * @var number $blue **/ private static $blue; /** * __construct * * @return void * @throws Exception **/ public function __construct() { throw new Exception('Tint is a static class. No instances can be created.'); } /** * Method for filtering an image * **/ public static function filter($original_image, $preview_image, $options) { self::$red = $options['red']; self::$green = $options['green']; self::$blue = $options['blue']; self::addCommand(self::colortone($original_image, $preview_image, self::RGBtoHEX(self::$red, self::$green, self::$blue), 100, 1)); self::run(); } /** * Method for converting RGB values to HEX values * **/ public static function RGBtoHEX($r, $g=-1, $b=-1) { if (is_array($r) && sizeof($r) == 3) list($r, $g, $b) = $r; $r = intval($r); $g = intval($g); $b = intval($b); $r = dechex($r<0?0:($r>255?255:$r)); $g = dechex($g<0?0:($g>255?255:$g)); $b = dechex($b<0?0:($b>255?255:$b)); $color = (strlen($r) < 2?'0':'').$r; $color .= (strlen($g) < 2?'0':'').$g; $color .= (strlen($b) < 2?'0':'').$b; return '#'.$color; } } |
You can see the additional argument passed to the filter() method is just an array of the filter's requirements. We were happy with this architecture and it worked out great as an easy way to allow developers to write their own filters and use all the power of ImageMagick.
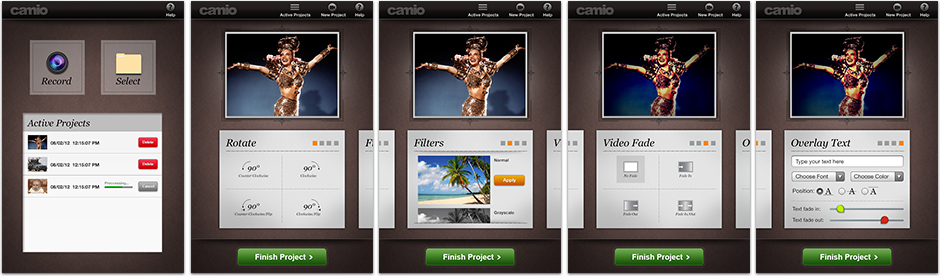
So now it was time to prototype an app for our iPhones to see if this thing actually worked. With some help from Cordova (aka Phonegap) we quickly prototyped an app in Javascript to call our API. Here's a demo of how that turned out.
To show how easy it is to use the API, here's an example of how to preview a filter in Javascript. More code samples can be found in the readme inside the project source on Github.
1 | function previewFilter(filter, filterred, filterblue, filtergreen, saturation){ /* filterred = 0 - 255 filterblue = 0 - 255 filtergreen = 0 - 255 saturation = -100 - 100 */ var xmlhttp = new XMLHttpRequest(); xmlhttp.onreadystatechange = function(){ if (xmlhttp.readyState == 4 && xmlhttp.status == 200){ var response = eval('(' + xmlhttp.responseText + ')'); if(response.success){ // refresh preview of filter // <img alt="" src="'%20+%20response.preview_image%20+%20'"> } else { //read response.message } } else if (xmlhttp.readyState == 4 && xmlhttp.status == 403){ var response = eval('(' + xmlhttp.response + ')'); // read response.message && response.code } else if (xmlhttp.readyState == 4 && xmlhttp.status == 400){ var response = eval('(' + xmlhttp.response + ')'); // read response.message && response.code } } var params = {}; params.filter = filter; params.filterred = filterred; params.filterblue = filterblue; params.filtergreen = filtergreen; params.saturation = saturation; xmlhttp.open('POST', API_SERVER + '/video/filterpreview/' + SESSION); xmlhttp.setRequestHeader('Content-type', 'application/x-www-form-urlencoded'); xmlhttp.send(objectToNameValuePairs(params)); } |
At this point we were very satisfied. The entire process was working well, so we thought, "Hey! Let's add photo capabilities too." Why not? All the routines were already in place, all we really had to do was cut out some of the steps since filtering one image was much simpler than a video. In fact we were already doing that each time you were previewing a filter! Once the photo endpoints were setup it was time to throw a new coat of paint onto the prototype. Luckily we have talented designers that were able to take the prototype and really 'make it POP' (don't tell them I said that).
We had a functioning Filter API that accepted videos and photos. We had a killer design to lay on top of an app. We had ambition, we had courage. What we didn't have was extra time. A product of this magnitude would require a lot of hands on time, support time for API developers, and time dedicated to the health of the application. That's why we're open sourcing it all so anyone who wants to benefit from the work we've already done can.